Taking screenshots can be incredibly useful for capturing important information or sharing content with others. In this guide, we will explore the various methods of how to screenshots on HP Envy x360 laptop running Windows 10/Windows 11. We will also address questions about the location of the Print Screen key and where screenshots are saved.
How to Screenshot on HP Envy x360 – 3 Simple Methods
Method 1: Screenshot on HP Envy X360 via Keyboard Shortcuts – Windows 10/11
Taking screenshots on your HP Envy x360 is a breeze when you utilize the convenient keyboard shortcuts. The latest version of the HP keyboard includes the Print Screen key located on the Shift key, which may initially appear confusing. However, with a little practice, you can master using this physical key on your Windows keyboard to capture screenshots effortlessly.
On HP Envy x360 and various other HP laptops, the Print Screen key is denoted by “Prn Scr.” Different Windows-based laptops may use alternative phrases such as “PrtScr,” “Prtsc SysRq,” or the complete phrase “Print Screen.”
Now, let’s explore the keyboard shortcuts involving the Print Screen key, assuming you have the Envy x360 with the Print Screen key on the Shift key:
Fn + Shift Keys: Capture and save to the clipboard
By pressing the Fn + Shift keys simultaneously, you can capture a screenshot of your screen and save it to the clipboard. To access the clipboard on your Windows operating system, press “Windows + V.”
Prn Scr + Alt: Capture and save current app to the clipboard
If you want to capture a screenshot of the current app you are using and save it to the clipboard, simply press the Prn Scr key along with the Alt key.
Prn Scr + Windows: Capture and save as a PNG file
To take a screenshot of your entire display and save it as a PNG file in the screenshots section, follow this shortcut: Prn Scr + Windows. The PNG file will be saved in the following location: This PC > Pictures > Screenshot. You can access your screenshots by navigating to this path.
Prn Scr + Windows + Alt: Capture and save current app as a PNG screenshot
For capturing a screenshot of your current app and saving it as a PNG screenshot, use the Prn Scr + Windows + Alt shortcut.
With these simple keyboard shortcuts, capturing screenshots on your HP Envy x360 becomes a seamless process. Whether you need to share an important snippet from your screen or save visual information for reference, these methods will come in handy.
Method 2: Take a Screenshot on HP Envy X360 with Snipping Tool – Windows 10/11
Another convenient method to capture screenshots on your HP Envy x360 is by utilizing the Snipping Tool, an inbuilt tool in the Windows operating system. The Snipping Tool allows you to capture either the entire display or a specific region of your screen. Here’s how you can access and use the Snipping Tool:
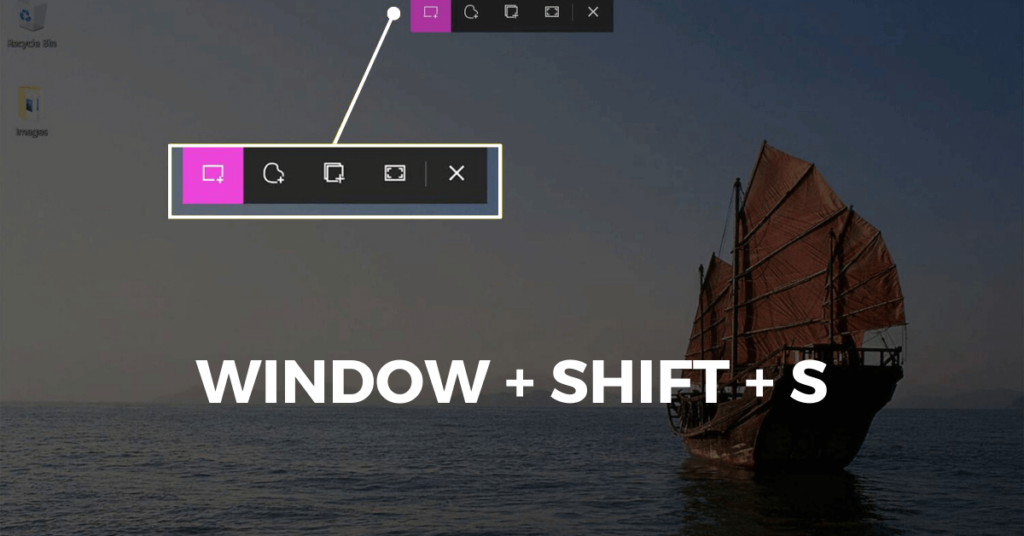
Press Windows + Shift + S:
To access the Snipping Tool quickly, press the Windows key, the Shift key, and the S key simultaneously. This keyboard shortcut will invoke the Snipping Tool and display a widget bar on your screen with four screenshot options.
Capture a screenshot:
By default, the Snipping Tool is set to the Rectangular mode, which allows you to capture a screenshot of a specific region on your screen. To capture a screenshot using this mode, follow these steps:
1: Place the Plus (+) sign:
Position the Plus sign cursor at one corner of the area you want to capture.
2: Drag and select:
Click and drag the cursor to select the desired region for your screenshot.
3: Release the mouse button:
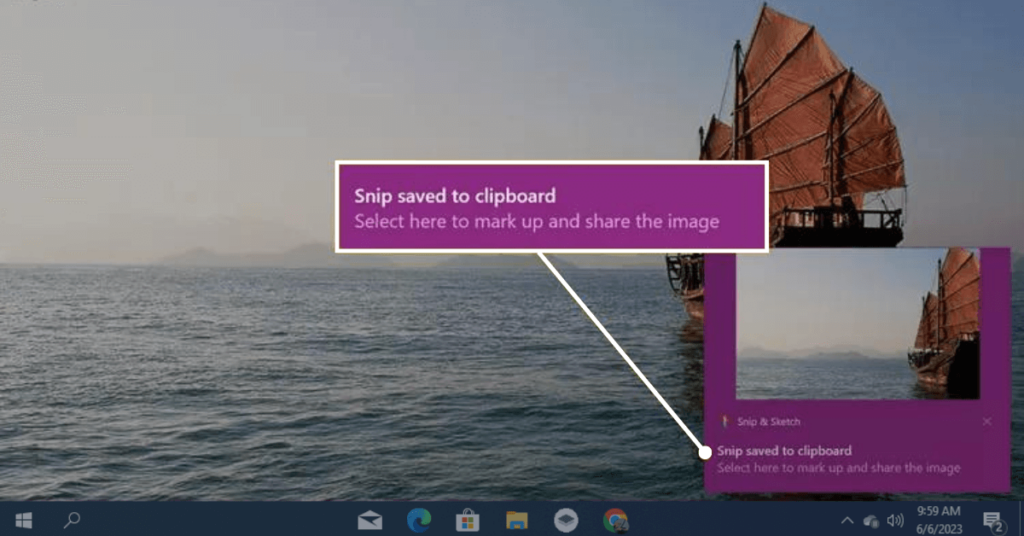
Once you have selected the region, release the mouse button to capture the screenshot. The screenshot will be saved to your clipboard.
Paste and edit the screenshot:
To access the captured screenshot, open any image editor on your PC and click CTRL + V to paste the screenshot from the clipboard. You can then edit and save the screenshot as desired.
Change screenshot modes (optional):
If you want to use a different screenshot mode other than the default Rectangular mode, you can manually search for the Snipping Tool and open it. In the Snipping Tool window, click on the “Mode” option, and a drop-down menu with four options will appear:
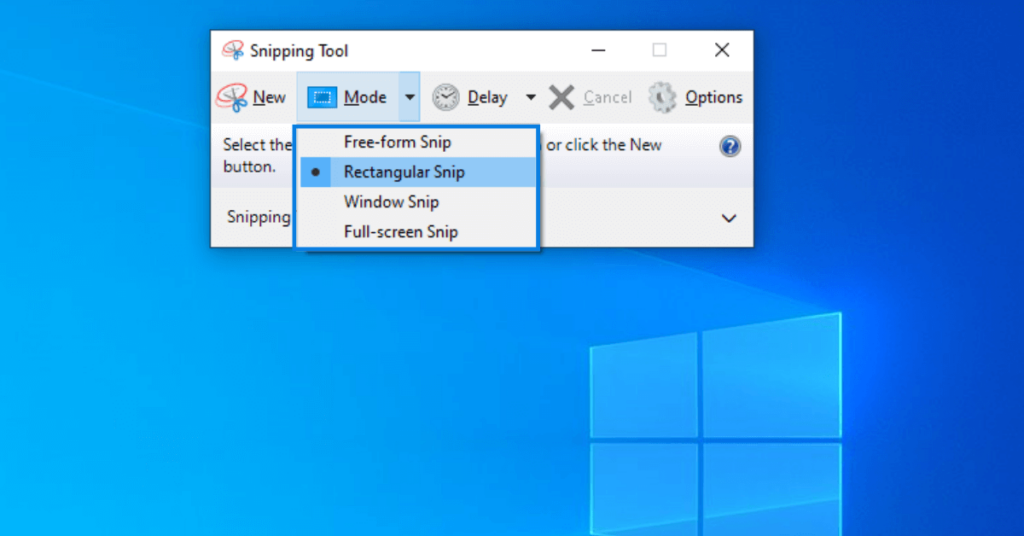
1: Rectangular Mode: This mode allows you to select a specific part of your screen within the tool, drag it, and release it to capture the screenshot.
2: Windows Mode: This mode captures a screenshot of a specific window or application.
3: Full-Screen Mode: Select this mode to capture a screenshot of your entire display.
4: Freeform Mode: With this mode, you can capture a screenshot of any shape or area on your screen.
With the Snipping Tool’s versatile options, you can easily capture screenshots on your HP Envy x360 according to your specific requirements. Whether you need to capture a specific region, a browser window, or the entire display, the Snipping Tool has you covered.
Method 3: Screenshot on HP Envy X360 using Windows Game Bar – Windows 10/11
If you’re an HP Envy x360 user looking to capture screenshots effortlessly, the Windows Game Bar provides a built-in solution. Originally designed for gamers to record their gameplay, the Xbox Game Bar offers a range of features, including the ability to capture screenshots without relying on third-party applications. Here’s how you can use the Xbox Game Bar to capture screenshots on your HP Envy x360:
Access the Xbox Game Bar:
There are two ways to access the Xbox Game Bar. You can either search for “Xbox Game Bar” using the Search Box in Windows, or you can use the convenient shortcut Windows + G.
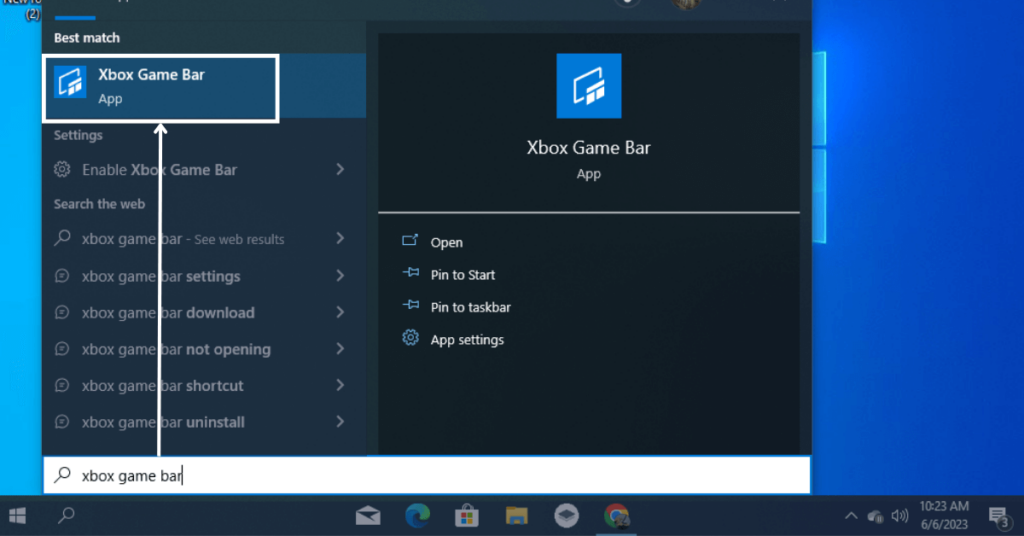
Click on the Capture icon:
Once you have invoked the Xbox Game Bar, you’ll notice a set of icons along the top of the screen. Locate and click on the Capture icon.
Select the screenshot option:
Within the Capture menu, you’ll find various options. To capture a screenshot, click on “Photo” or “Take a screenshot.” This will capture the current screen and save it to your designated screenshots folder.
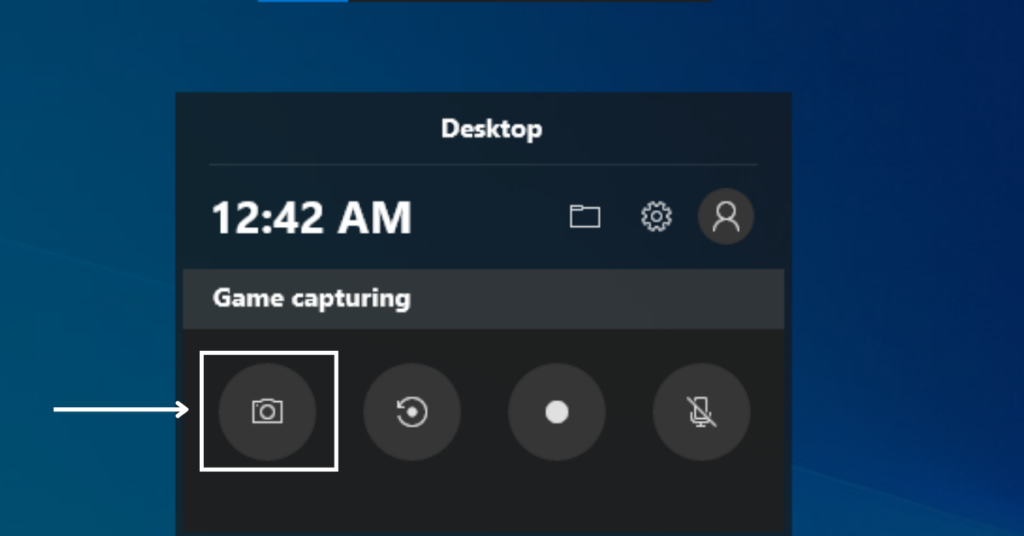
By utilizing the Xbox Game Bar, capturing screenshots on your HP Envy x360 becomes a seamless process. Whether you’re an avid gamer or simply need to capture and save important moments from your screen, this built-in tool provides a convenient solution.
Where Is the Print Screen Key on the HP Envy x360?
The Print Screen key, often denoted as Prn Scr or PrtScn, is a vital function for capturing screenshots on a Windows computer. However, the placement of this key can vary depending on the keyboard model. If you are an HP Envy x360 user, you might notice that the traditional Print Screen key is absent. But fret not, as HP has integrated its functionality into another key on the keyboard.
On the HP Envy x360 keyboard, the Print Screen function has been added to the right Shift key. This means that to capture a screenshot and save it to your device’s clipboard, you will need to press Shift + Fn simultaneously. By pressing these keys together, you activate the Print Screen functionality, allowing you to capture your screen effortlessly.
For more advanced screenshot options, such as using the Snipping Tool, you can utilize the combination of Windows + Shift + Fn keys. This key combination will open up the Snipping Tool, which provides additional capabilities for capturing specific regions or windows on your screen.
Note: The Fn key, short for Function, is used to activate the secondary function of keys that have multiple uses. In this case, pressing Fn along with the designated key (Shift) allows you to access the Print Screen feature.
If, however, you are using a Windows keyboard that does not have a dedicated Print Screen key or a similar substitute, don’t worry. There are alternative methods available. You can make use of the Snip & Sketch tool or the Xbox Game Bar, both of which offer built-in screenshot-capturing functionalities. Additionally, you can opt for third-party screencaps or screen capture apps that are readily available for download.
While the Print Screen key may not be located in its conventional place on the HP Envy x360 keyboard, its functionality has been incorporated into the right Shift key. By pressing Shift + Fn, you can effortlessly capture screenshots on your HP Envy x360 and save them to your clipboard. Don’t forget to explore other available options like the Snipping Tool, Snip & Sketch, or Xbox Game Bar for more advanced screenshot needs.
Where Do Screenshots Go on an HP Envy x360 Laptop? (Windows 10/11)
Taking screenshots on your HP Envy x360 laptop can be incredibly useful for capturing and sharing information. However, once you’ve taken a screenshot, you may wonder where it is saved on your device. In this guide, we’ll explore the different locations where screenshots are stored on an HP Envy x360 running Windows 10 or Windows 11.
When you press the Print Screen (Prn Scr) key on your keyboard, the screenshot is instantly saved to your laptop’s clipboard. This means that the image is not saved as a file but is instead stored in the clipboard’s memory. To access the screenshot, you can simply paste it into another document or application by pressing Ctrl + V or selecting the Paste option within the desired app. Whether you’re working on a Photoshop file or a Microsoft Word document, pasting the screenshot allows you to incorporate it seamlessly.
If you want to save the screenshot as an image file directly, you can use the Windows + Prn Scr shortcut. When you press these keys simultaneously, the screenshot is captured and automatically saved as a PNG file in the default location: This PC > Pictures > Screenshots. By navigating to this location, you can easily locate and access your saved screenshots. Remember that the PNG format provides high-quality images and is the default file format for screenshots on Windows.
Note: If you’re searching for the saved screenshot within an app’s file browser, ensure that either the PNG format or All Formats are selected to ensure the screenshots are visible in the search results. This way, you won’t overlook any of your saved screenshots when browsing for them within specific applications.
Another method of capturing screenshots on your HP Envy x360 is by using the Windows Snip & Sketch app. When using this app, you have the flexibility to choose the location where the screenshot is saved. By default, the Snip & Sketch app saves screenshots to This PC > Documents. If you can’t recall the exact location where you decided to save a particular screenshot, there’s a good chance you’ll find it in the Documents folder.
Conclusion
Capturing and locating screenshots on an HP Envy x360 laptop running Windows 10 or Windows 11 is a straightforward process. By using keyboard shortcuts such as Print Screen and Windows + Prn Scr, as well as utilizing tools like the Snipping Tool or the Windows Game Bar, you can effortlessly capture and save screenshots of important information. Whether you choose to save them to the clipboard for immediate use or as image files in specific folders, you can easily access and manage your screenshots as needed. Familiarizing yourself with these methods will enable you to efficiently utilize the screenshot feature whenever the need arises.
FAQs
How do I take a screenshot on my HP Envy x360 Windows 11?
To take a screenshot on HP Envy x360 running Windows 11, simply press and hold the PrtSc key. This will capture your entire Windows 11 screen and save it to the clipboard.
How to do a screenshot on an HP laptop?
To take a screenshot on an HP laptop, make sure the desired window is active. Then, press the Alt and PrtScn keys simultaneously to capture a screenshot of the active window.
How do I take a screenshot on my HP Envy without the Print Screen button?
You can take a screenshot on an HP laptop without the Print Screen button by using the snipping tool. Launch the snipping tool and select the desired capture area to take a screenshot.
How do I take a screenshot on my HP Pavilion x360 tablet mode?
In tablet mode on an HP Pavilion x360, press the Windows key and Print Screen simultaneously to capture the entire screen. Then, open an image editing program and press Ctrl + V to paste the screenshot.
How do I take a screenshot on my laptop if my PrtSc is not working?
If the PrtSc key is not working on your laptop, you can use an alternative method. Press the Windows key + U to open Ease of Access, scroll down to Keyboard, and enable the Print Screen Shortcut option.

Kenny Trinh is a seasoned expert in the field of laptops and technology, boasting an extensive background enriched by years of hands-on experience and in-depth research. With a keen eye for innovation and a passion for staying ahead of the technological curve, Kenny has established himself as a trusted voice in the tech community. Holding a prestigious degree in Computer Science, he combines his academic insights with practical expertise to deliver valuable insights and recommendations to his readers and followers. Through his work, Kenny aims to demystify complex tech concepts, empowering individuals to make informed decisions and optimize their digital experiences.
