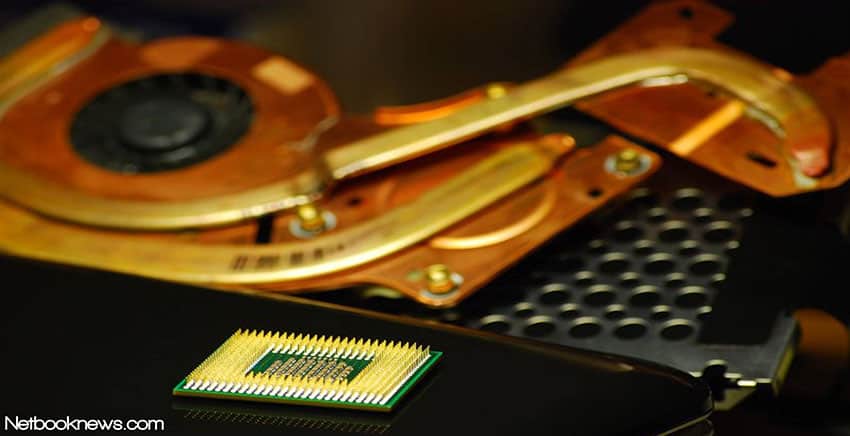
If your laptop has been running a bit hot lately, and you’ve been looking to increase its cooling fan speeds. Here’s a quick but detailed guide on how exactly to do that.
There could be numerous reasons why you would want to change the fan speed on your laptop. Perhaps its fans become audible whenever your in a meeting, or you just want to set your own custom fan curve that you know will work better than its stock settings.
There are multiple ways in which you can tweak the fan speed of your laptop, these include
Before we begin
we should mention that changing your laptops fan speed could potentially lead to premature wear of components, or damage to your laptop. So proceed at your own risk.
If you run your cooling fans at too high a speed for prolonged periods of time, parts like bearings or fan blades within its assembly could wear out quicker, and the component might die all together.
If you run them at too low a setting, you could risk overheating your CPU and/or your GPU as well. So be sure to not go to either extremes when altering your fan speeds.
Some laptop manufacturers like Dell also don’t allow you to change the fan speeds in the first place. So this guide might not work for you. Be sure to google your laptops make and model before this to see if people have been successful in tweaking their laptops fan speeds.
How To Increase Laptop Fan Speed
Speed Fan – Windows
Installing Fan control software is by far the easiest method to change your laptop’s fan speeds. It also allows you to set up custom fan speeds, as well as define temperature targets points where the fans either speed up or slow down.
There are a plethora of such software available on the internet. Everyone has different luck when it comes to which of these software will actually work on their laptop. So if one doesn’t work, just try another. Eventually one of them is bound to work.
Speed Fan is one of the most popular softwares available for controlling fan speeds. Speed Fan can either ramp up or slow down the fan speed based on the temperature of one or even multiple components within your laptop.
So even if your hard disk drive if overheating, you can set the fans to a higher speed as soon as it crosses a temperature threshold.
The configurability with Speed Fan is endless. To download it, click on the link here.
1. Start the Fan Speed program, it will be located in the system tray once it has executed.

2. You will be greeted by the following layout
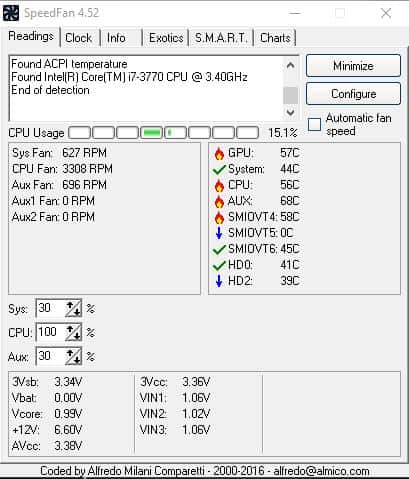
3. There is a section marked “Automatic Fan Speed” click it if you want SpeedFan to automatically handle all fan controls for you.
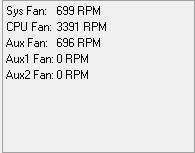
4.You can see all your systems fans in this section.
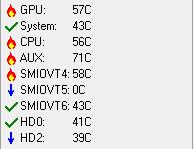
5. You can monitor the temperature of critical components in your laptop here.
6.Near the lower section of the window you will see a section with fan speed percentages.

7. You can increase or decrease the fan speed percentage here of each fan in your system.
8. To alter the way the fan speeds react to temperature changes click on Configure.

9. Over here you can see a list of all the components Smart Fan can monitor.
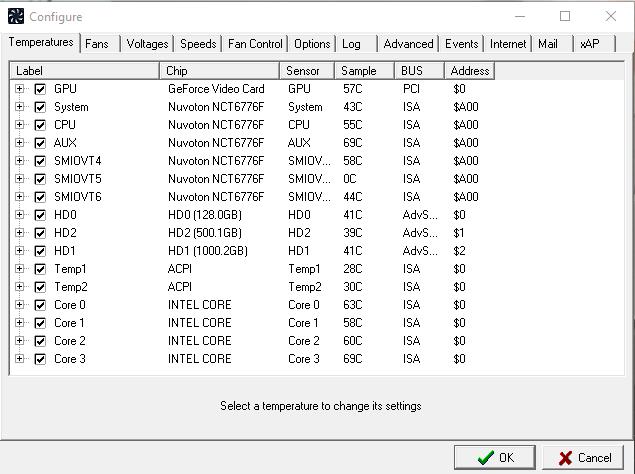
10. Click on a specific component, for example Core 0 of your CPU.

11. Near the bottom of the window, you will see a section marked “Desired”. If you set it to 40C for example, Speed Fan will automatically alter the fan speeds to keep this component at this desired temperature.

12. Click on the + symbol near the component you choose to expand it.

13. This will bring up your laptops cooling fans in the drop down, you can select which fans you want to have their speed increase/decrease when Core 0 goes above or below the “Desired” temperature.

Open Hardware Monitor – Windows
Open Hardware Monitor is another free tool free that is both lightweight and packed to the gills with useful features. While Open Hardware Monitor doesn’t allow you to actually set a custom fan curve, you can manually set the fans to a desired speed.
What I do with this software is whenever I’m about to play a game, I just manually set my fan speeds to around 90%. This avoids any risk of overheating, especially if you live in a hot climate
When I’m finished I just close the software, and the fans go back to their stock factory set fan curve. To download Hardware Monitor click on the link here.
1. Open Hardware Monitor, you will be greeted with an interface like this.
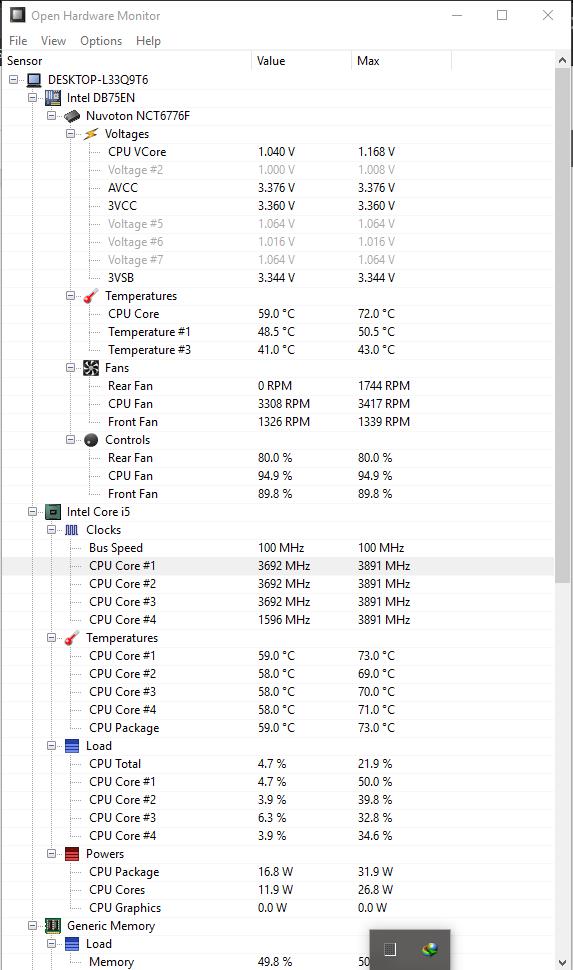
2. There will a section marked Fans, and Control. Expand them both.

3. You will see all your laptops fans listed here.
4. Right click on any fan and move the cursor to Control
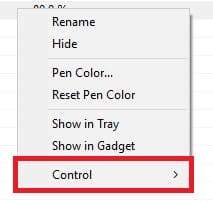
5. Move the cursor to manual

6. From here you can set what % you want this particular fan to be set to.

7. If you want to restore it back to default fan curve, instead of clicking on manual click on default.

MSI Afterburner – Windows
MSI Afterburner is probably the most popular GPU overclocking software on the market right now. It provides you in depth control over variables such as core clock, voltage and as well as GPU fan speeds.
So if your only looking to change the fan speeds of your GPU, just to get that extra bit of performance. This particular software is the one for you. To download it head to this link. Scroll down to the bottom of the page and download MSI Afterburner.
For MSI afterburner to work your also going to need to download Riva Statistics Tuner, if you want to utilize its extra features such as an on screen display for displaying statistics like CPU speed or GPU temperature. Head to the link here to download it.

- Download, install and open MSI Afterburner, its interface will look a little like this depending on what skin you are using for it.
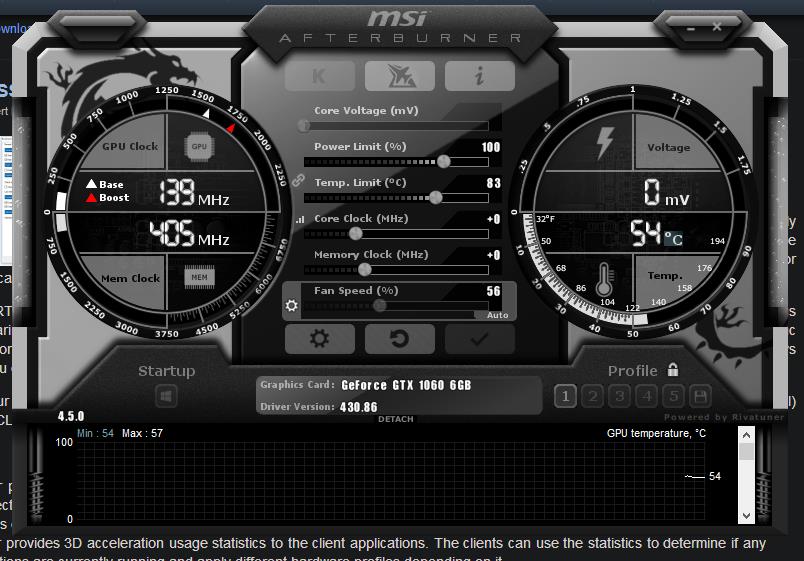
2. There will be a slider marked fan speed, manually increase or decrease the percentage slider to increase the fan speed of your GPU.

3. To set a custom fan profile click on the gear icon.

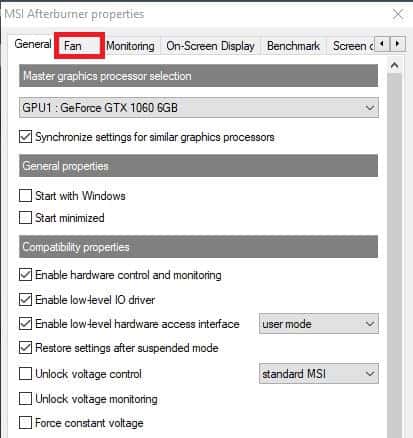
4. Click on Fan in the upper menu
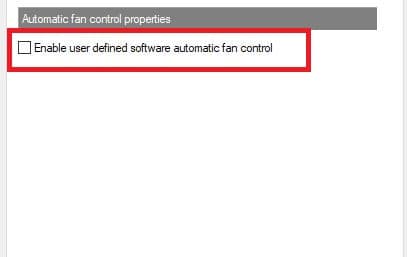
5. Make sure the checkbox “Enable user defined software automatic fan control” is checked
6. Using this graph you can change at how the fan speed changes based on the current GPU temperature.

7. The Y-Axis is the Fan speed % while the X-Axis is the GPU core temperature.
8. Make sure “Custom” is selected in the Predefined fan speed curve dropdown.

Tweaking BIOS Settings – Windows
There is also a way that you can change the fan curve on your laptop, by going into the BIOS and altering some settings.
This option may not be available on all laptops, so don’t worry if you don’t find it in your BIOS. That just mean this method of fan curve tweaking isn’t supported by your particular laptop.
1. Restart your laptop
2. As soon as it boots up start pressing the F2, F12 or F10 key. Consult your laptop manual to find which specific key you need to press to take you into the BIOS.
3. Use the arrow keys to navigate through the BIOS menu.
4.Search for a section that says “Fan Speed Control” or something
5. From this section you should be able to alter your fan speed.
Install Macs Fan Control – MacOS
For MacOS the best application that is available is Macs Fan Control. Even though the name suggests otherwise, the software is also available for Windows.
To download the Macs Fan Control application, click on the link here. It’s a lightweight tool as well, so you won’t need to worry about it slowing down your MacBook either.

1. Open Macs Fan Control, its interface should look a little something like this.
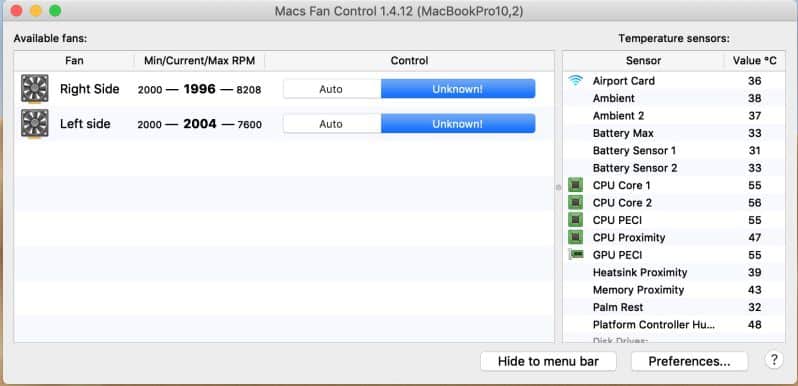
2. Choose a fan, and click on the blue button, this button could say “Unknown” or “Custom”.
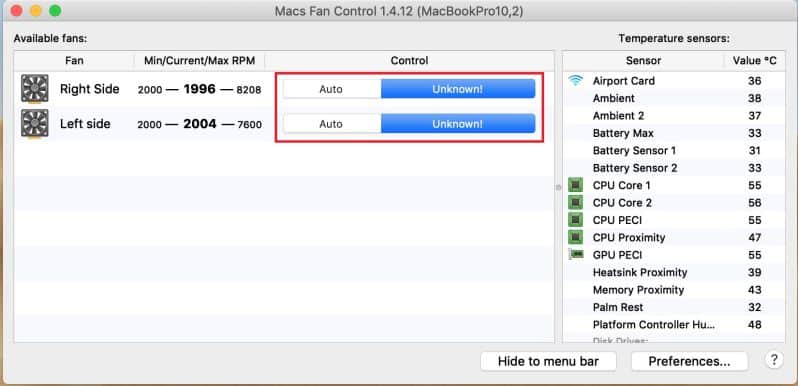
3. From here you can set a constant fan speed, or one based on a Sensor.
4. To set a constant fan speed, click on Constant RPM (Rotations Per Minute) Value.
5. From here you can adjust the slider to set the desired RPM for your fan.
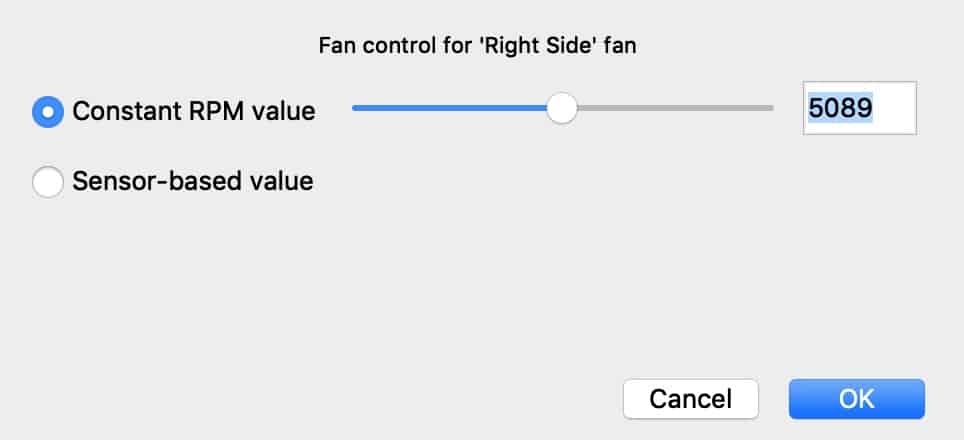
6. To have a sensor based value, click on the second option
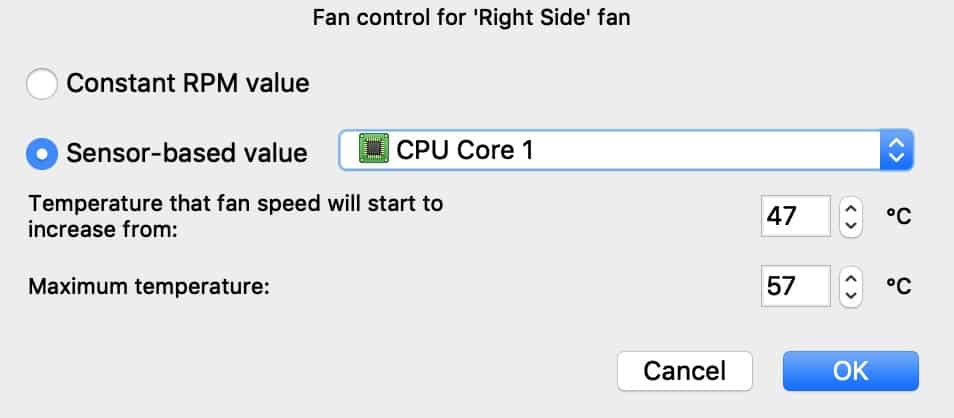
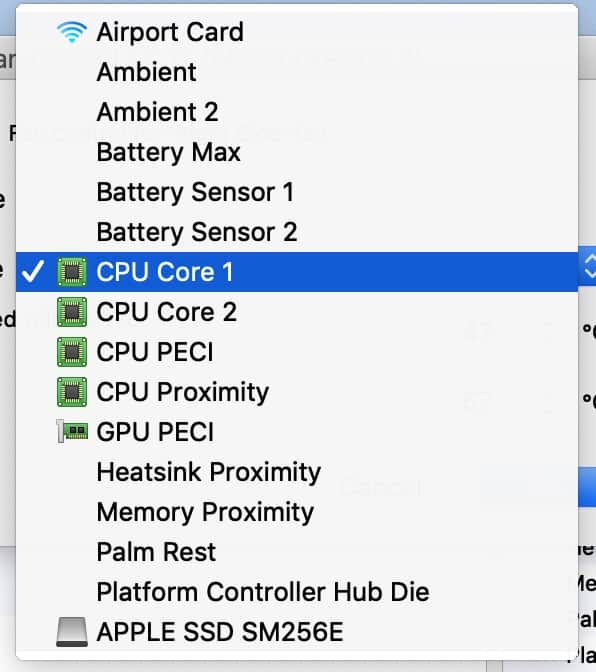
7. To choose which temperature sensor this fan will increase or decrease its temperature select the drop down menu. In this case let’s choose CPU Core 1.
8. Over here you can set the temperature at which fan speeds will start to rise, as well as the maximum allowed temperature.

9. Once these values are set the application will automatically adjust the fan speeds to keep this particular laptop components temperatures within this range.
Conclusion
After reading our quick but detailed guide you should be able to have tweaked the fan speed on your laptop if it supports it. What method worked for you to alter to fan speed?
Be sure to tell us leaving a comment down below alongside your laptop make and model. If you feel we missed anything, be sure to leave that down below as well!
Hassaan has been passionate about technology for as long as he remembers, and aims to provide you with all the information you need to find the right laptop for you.
